Fabergé Egg Craft
This is a fun crafting activity for all ages to enjoy! Of course you can enjoy this activity any time of year, but it would be a big hit during the Spring/Easter season when egg decorating is on everyone’s minds.
A Short History on the House of Fabergé
Fabergé eggs are perhaps the most famous decorated eggs in the world. These are the jeweled eggs created by the House of Fabergé, a renowned Russian jewelry firm founded by Gustav Fabergé in 1842. Between 1885 and 1917, the jewelry firm produced 52 “Imperial” eggs as Easter gifts for the wives and mothers of Russian Tsars Alexander III and Nicholas II. Peter Carl Fabergé, Gustav’s son, introduced the eggs after Tsar Alexander III’s brother, Grand Duke Vladimir Alexandrovich, suggested creating a jeweled egg for the Tsarina.
Following the immense success of the first egg, known as the Hen Egg, Alexander III appointed Fabergé as a “goldsmith by special appointment to the Imperial Crown,” and the Imperial family commissioned an egg each year until the Russian Revolution in 1917. According to Fabergé family lore, Peter Carl Faberge was given complete freedom to design the eggs. The Tsar himself didn’t even know what form they would take, each one seemingly more and more elaborate than the last. Forty-six of these exquisite eggs still survive and are worth millions of dollars today.
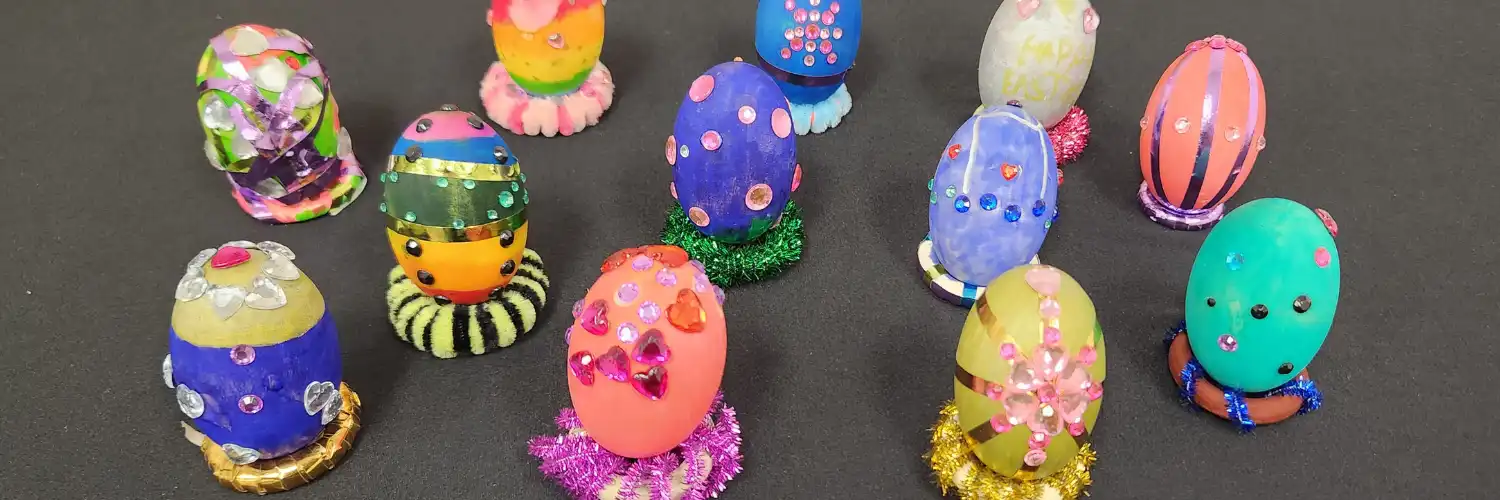
Craft Your Own Ornamental “Fabergé Egg”
Before beginning this craft, take some time to browse through photos of real Fabergé eggs for inspiration. You can find plenty of photos by doing a Google search and browsing the image results. Or, a complete list of all the Fabergé imperial Easter eggs with photos and links is available in this Wikipedia article. Have fun!
Materials Needed:
- Sturdy, nonperishable egg-shaped object for decorating (An unfinished wooden craft egg is recommended, but you could also use plastic or stone eggs. If using colored plastic eggs, you could skip the markers/paint.)
- Stand to hold your finished egg (You can purchase pre-made “egg stands” or use wooden macrame rings and pipe cleaners to make your own.)
- Markers or paint
- Metallic washi tape (Alternatively, you could use metallic markers and a steady hand.)
- Flat-backed gems/rhinestones of various colors, shapes, and sizes (You can invest as much as you want here, but the plastic imitation gems work just fine!)
- Glue (Elmer’s glue will work and dry clear, but you can use something stronger if desired. Hot glue is not recommended for this activity.)
- Nail Tees (These are pointed Q-tip swabs used for nail art touch-ups.)
Instructions:
- Start by using paint or markers to cover your egg in a base color or pattern. Allow to dry completely.
- While the egg dries, prepare your egg stand. If using wooden macrame rings, you can color them and/or wrap them in ribbon or pipe cleaner to match or accentuate your egg.
- Apply metallic washi tape in desired pattern(s) on your colored egg. You can make straight lines or crisscross patterns, depending on your preference. Look at real Fabergé eggs for inspiration!
- Tip: Make sure your egg is completely dry before applying the tape. You may want to use a bit of glue to secure the tape at its ends.
- Embellish your egg with gems and/or rhinestones, using glue to fix the stones to your egg. The easiest way to do this is to place a dot of glue on your egg where you intend to fix the stone. For greater precision, dip a nail tee into glue and use this pointed tool to dot glue onto the egg. Stick the stone to the glue, and press and hold it for a bit before moving on to the next stone. This part of the activity is a bit tedious, but it will be worth all the effort in the end! Make sure you allow the glue to dry completely. Look at real Fabergé eggs for inspiration, but here are some ideas:
- Use the washi tape as a guide and glue the stones at points where the tape intersects or between the spaces created by the washi tape.
- Glue a large stone as a focal point on the side of your egg and surround it with smaller stones.
- Glue stones in circular patterns (like latitudinal lines on a globe) emanating from the top of the egg.
- After everything dries, use your egg stand to display your work of art to friends and family! Take photos of your completed work and share!
We hope you enjoyed this crafting idea! We would love to see photos of your finished products.
Share with us on Facebook and Instagram (and we might just share it with our friends too!).